We all need to be encouraged once in awhile not matter if you are a kid or adult. I encourage my grandkids to get up and help in the kitchen cooking breakfast like this morning. We made biscuits cinnamon rolls bacon and eggs. They got the table ready after the breakfast was put in the pans. Later they will be encouraged to help with house work. I encourage them to plant flowers and keep them watered to watch them grow and learn how to take care of things.
Take time to encourage each other no matter how young or old you are. Keep encourage and make a change this world.
We all fear the unknown especially with what has been going on this year. We just have to put our fear away and put on the armor of GOD to help us through these times of uncertainty. My fear is when the grandkids go back to school they just truly don’t understand what is going on. They are doing online course which is what my grandson ended up finishing his first year of school last school year. This is my granddaughters first year of school so she is starting out online and hopefully they all get to go back face to face without the worry of COVID-19. I worry about my family every day I have been working through this from day one. Processing medical records from hospitals we touch the papers all day long so you just pray that all germs have died before you get the records. So fear is all around us daily. God bless and keep us all safe.
Step 1Preheat oven to 350 degrees F (175 degrees C). Grease 12 muffin cups, or line with paper muffin liners.
Step 2Combine flour, sugar, baking soda, cinnamon, and salt in a large bowl. Mix egg, oil, milk, lemon juice, and vanilla extract in a bowl; stir into dry ingredients until just moistened. Fold in zucchini, chocolate chips, and walnuts. Fill prepared muffin cups 2/3 full.
Step 3Bake in preheated oven until a toothpick inserted into the center of a muffin comes out clean, 20 to 25 minutes.
Mix ingredients together and knead with hands. If sticky, add a handful of flour. Roll into a ball and press a hole in the middle with a spoon. Pour oil into hole and then spread over the top. Cover with wax paper and set in a warm place to rise. Let it double in size.
Grease pans with shortening. Squeeze off a small ball of dough. Knead and roll in shortening. Place in pan in rows, 1/2 inch apart. Let dough rise to top of pan. Bake at 350F for 30 minutes. Smear shortening on top of rolls and let cool for 15 minutes in the pan and then turn them out onto a towel and let bottoms cool. Then return to pan.
Confectioners’ sugar and fresh fruit or maple syrup
Directions
In a large bowl, combine the flour, baking powder and salt. In a small bowl, whisk egg yolks, milk and butter. Stir into dry ingredients just until moistened.
In a small bowl, beat egg whites on medium speed until soft peaks form. Fold into batter.
Bake in a preheated waffle iron according to manufacturer’s directions until golden brown. Top with confectioners’ sugar and fruit or serve with syrup.
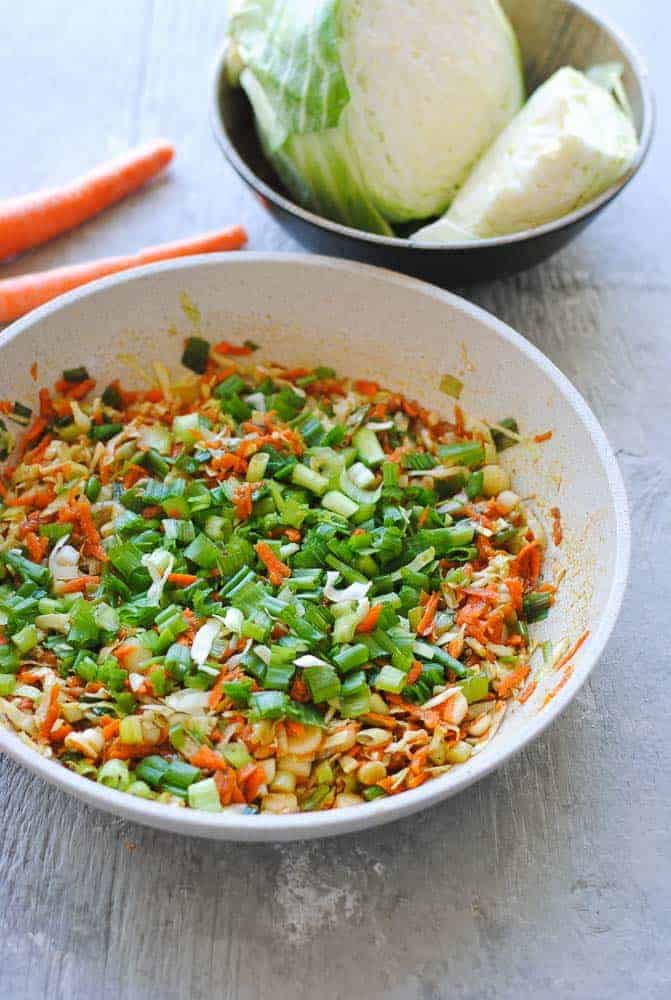
An easy vegetable spring rolls recipe with a delicious filling of cabbage, carrot and spring onion greens. Crispy and golden on the outside and bursting with flavour at first bite!
THE FILLING INGREDIENTS
shredded cabbage
shredded carrot
spring onion
garlic, chopped
soy sauce
hot chilli sauce (optional)
white pepper, ground
cornflour
white vinegar
oil, for frying
This makes for a delicious filling. The veggies are tossed in two tablespoons of oil and the other ingredients are added to them quickly. The whole process takes all of 3 minutes (minus chopping of the vegetables).
HOW TO FOLD SPRING ROLLS
The steps are self explanatory but I will elaborate on one thing: how to seal the rolls. Dissolve 2 teaspoons cornflour in 2-3 tablespoons of water to make a thick, sticky sludge that acts like a glue. Using your finger, dab this on the edges of a wrapper and seal it. Press for a few seconds to make sure the edges don’t come apart again.
TIPS FOR MAKING THE PERFECT VEGETABLE SPRING ROLLS RECIPE
1. Wait for the veggie filling to cool completely before assembling the rolls.
2. Keep the wrappers and the prepared rolls covered with a damp tea towel at all times since they dry out very fast.
3. When sealing the wrappers, apply the cornflour sludge with your fingers and press for a few seconds to seal them. If they are not sealed, the filling will come out while you’re frying them.
4. The oil has to be at the correct temperature for making perfectly golden brown and crispy spring rolls. If the heat is too low, the rolls will absorb a lot of oil and turn soggy. If it is too high, on the other hand, the rolls will not be evenly golden, but pockmarked!
Tip: I always test fry one roll before I add the others.
5. Fry the rolls in batches if you’re frying them all. Overcrowding in the wok will also lead to uneven frying.
TWO SIMPLE WAYS TO MAKE THESE ROLLS QUICKER
1. Instead of shredding the vegetables by hand, you can buy small bags of pre-shredded cabbage and carrot available in the produce section of the supermarket. You will still have to chop the spring onions, but this only takes a couple of minutes.
2. Shred the veggies in a food processor using the shredding blade. Obvious and simple hack!
WHAT TO SERVE WITH SPRING ROLLS
If you want to go the easy route with the minimum of fuss, serve spring rolls with ketchup. I had a too-sweet plum sauce languishing in the fridge, so I mixed some with regular ketchup and made my own dip of sorts! You can do the same if you have any left-over sauces from other recipes, maybe.
But if plain ol’ ketchup is boring or you don’t have anything else at hand, here’s a good post from A Beautiful Mess all about dips for spring rolls. You’ll find not one, but three different dipping sauces. Choose the one you fancy to make your spring rolls eating experience really interesting. A good sauce is what gives a fried snack that extra kick, after all. Just my opinion.
HOW TO KEEP SPRING ROLLS FRESH
The best way to keep recently made, unfried spring rolls fresh is to wrap them in a damp towel and keep them in an airtight container in the refrigerator. Assuming, of course, that you are going to fry them in a couple of hours. They will be none the worse for frying later.
If you have fried left-over spring rolls (never happens in my home), wrap them first in some paper towels, then cling wrap and store them in an airtight container. When you want to reheat them, it is best to pop them in a preheated oven for a few minutes for crispy rolls again. Microwaving them will make them soggy. Also, never store fried spring rolls in the freezer as you’ll get a soggy mess when you defreeze them.
What I like to do is to make a large batch at a time and then freeze them. Since unfried spring rolls freeze beautifully, it just takes a little effort upfront but it’s very convenient subsequently. All I need to do when I want to eat some is to take them out of the freezer and fry them. They taste fresh and crispy when fried, as they should.
If you want clear instructions on how to store spring rolls in the freezer, check out this lamb kebabs recipe of mine. I use the exact same method to store spring rolls too.
1 tablespoon confectioners’ sugar for dusting, or as needed
Directions
Instructions Checklist
Step 1Move an oven rack into the middle of the oven. Preheat oven to 350 degrees F (175 degrees C).
Step 2Spray 24 muffin cups with cooking spray.
Step 3Line a work surface with waxed paper.
Step 4Spoon 1 teaspoon melted butter into the bottom of each sprayed muffin cup.
Step 5Spoon 1 tablespoon brown sugar in each muffin cup.
Step 6Press a maraschino cherry into the center of the brown sugar in each muffin cup.
Step 7Spoon a heaping tablespoon of crushed pineapple over the cherry and compact it with the back of a spoon into an even layer.
Step 8Mix pineapple cake mix, eggs, pineapple juice, and vegetable oil in a large bowl with electric mixer on low speed until moistened, about 30 seconds. Turn mixer speed to medium and mix for 2 minutes.
Step 9Pour pineapple cake batter into the muffin cups, filling them to the top; do not overfill.
Step 10Bake in the preheated oven until a toothpick inserted into the center of a cupcake comes out clean, about 20 minutes.
Step 11Allow cupcakes to cool at least 5 minutes before inverting muffin cups onto the waxed paper to release. Serve with pineapple and cherry sides up. Sprinkle cupcakes lightly with confectioners’ sugar.
Step 1In a medium saucepan, whisk together egg yolks and sugar until well blended. Whisk in milk and cook over medium heat, stirring constantly, until mixture boils. Boil gently for 1 minute, remove from heat and allow to cool slightly. Cover tightly and chill in refrigerator 1 hour.
Step 2In a medium bowl, beat cream with vanilla until stiff peaks form.
Step 3Whisk mascarpone into yolk mixture until smooth.
Step 4In a small bowl, combine coffee and rum. Split ladyfingers in half lengthwise and drizzle with coffee mixture.
Step 5Arrange half of soaked ladyfingers in bottom of a 7×11 inch dish. Spread half of mascarpone mixture over ladyfingers, then half of whipped cream over that. Repeat layers and sprinkle with cocoa. Cover and refrigerate 4 to 6 hours, until set.
Delicious low-fat version that’s full of flavor. Minutes to Prepare: 8Minutes to Cook: 7Number of Servings: 4
Ingredients
1 tablespoon
Canola Oil
¾ pound
Uncooked Shrimp (peeled and deveined)
1
Med Green Onion (diced)
¼ teaspoon
Garlic Powder
½ teaspoon
Basil
¾ teaspoon
Parsley
1 tablespoon
Lemon Juice
3 tablespoons
Parmesan Cheese
Directions
In 10″ skillet, heat oil over medium high heat. Add shrimp and all ingredients. Cook 3-7 minutes (depends on size of shrimp, smaller shrimp cook faster.) Remove from heat; sprinkle with Parmesan cheese. Serving size=1/4 of shrimp. To make dividing it up easier, spread out the shrimp and divide the pan into quarters, each quarter is a serving.
Tip: remember C & O…when the shrimp are shaped like a “C” they are cooked, when they look like an “O” they’re overcooked.